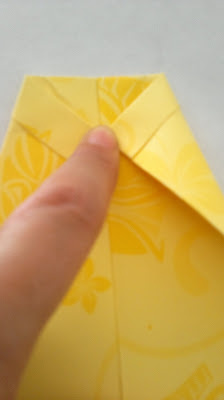
I'm sure you've seen tutorials similar flooding in the internet but let me just show you how I did mine.
I used an A3 size decorative paper bought from Visayan Bookstore. It's one of the places I love scouting for Nice and cheap craft materials.
Turn the paper upside down, with the printed part facing the table.
Vertical Fold
Sleeve Fold
Open the Paper again and fold as follows.
This is prolly the only tricky part in folding but practice makes perfect. In no time you'll get the hang of it. Promise.
Collar Fold
Turn the paper upside down, Now we will fold the opposite end for the t-shirt's collar.
Fold as follows.
Remember, whatever you do on one side you do it to the opposite side too.
And then do the same with the opposite side.
Fold the bottom end and insert it to the collar. And TADA....
That's it!
Now the rest is up to your imagination. Embellish. Embellish. Embellish. You can add a tie, or draw a pocket perhaps, or even a button will make a cute addition to this card.
Here's what I did last year's Father's day. You can read about it here.
Happy weekend everyone. Hope you enjoyed this one :)
PhoebeCarla
------------------------------------------------------------------------------------------------------------------------------------------------------------------------------------------------------------
If you enjoyed this one, check my other tutorials you might like it too :)
------------------------------------


12 comments:
This is really cool shirt card Sis :-) so beautiful :-) Thank you for the tips too, very helpful :-)
genius I bookmark this blog for future preferences
Cool tutorial. I love origami. :)
cute, i will try this one! Mahina ako sa art works eh!
Hello there. I love DIY projects like this. I saw this a lot of times during parties and always thought it's hard to make. Your step-by-step photos are very encouraging.
wow! cute!!!!!!
ma try nga ito..napaplibutan ako ng mga lalaki sa work and i greet them..all of them on their bday..I think this would be a nice token for them..
really nice, i'll try to recreate it. I'm not really very crafty. thanks for this share
Oh, wow! I remember doing this back in highschool when my friends and I used to write notes to each other. I've forgotten how to do it though. Now thanks to your tutorial, I can do it again.
wow very nice.. i should try this one..
I know how to make this since I was nine years old :) Never thought small things like this still exists :) Enjoy everyone in making and trying out this one :)
Visit my blog and join my giveaways http://jeniferbalatico.blogspot.com/2012/06/perfume-maniac-giveaway-open-to.html :) Also drop a message if you want a follow back or link exchange http://jeniferbalatico.blogspot.com/2012/06/perfume-maniac-giveaway-open-to.html
Wow! I will be making one of these this weekend... great post and great tips!
This design is steller! You obviously know how to
keep a reader entertained. Between your wit and your videos, I was
almost moved to start my own blog (well, almost.
..HaHa!) Fantastic job. I really loved what you had to say, and more than
that, how you presented it. Too cool!
Feel free to surf to my site :: コーチ 時計
Post a Comment